maandag 2 februari 2015

Simple encryption and decryption using GnuPG

About a year ago, I started to experiment with encryption. My goal was to be able to encrypt a file from Java, since I am a Java developer and I believe that it should be a basic skill to be able to encrypt and decrypt files from your programming environment.

For encryption from Java, the Bouncy Castle libraries are recommended, and I want to come up with a simple as possible Java program that will encrypt and decrypt a file, but that will be in some later post. Using the Bouncy Castle libraries is far from easy, and they tend to change now and then, so that when you upgrade to a newer version, you might have to change your code.
This is from experience, because my Java program, which used some 1.48 version, didn't compile with the latest, 1.51 version... and when I found an example of a Java program, that did compile with the 1.51 version, the compiler gave a lot of "deprecated" warnings and that new example is way more complicated than I have in mind when thinking of "the most simple" example.

Luckily, I still have my examples of encryption and decryption from the command line, and these examples are more stable, in that they will keep working even if you upgrade the software. And that software is GnuPG, which I run in a Cygwin environment.
I would recommend to anyone, who wants to learn encryption in Java, to learn to use this tool, because it is an easier way to learn about the concepts of encryption, which will be helpful when you start to use it in Java, and it provides a check to see if your Java program produces the file you wanted it to produce.

And so my first post about encryption will summarize some basic commands for encryption and decryption from the command line, using GnuPG.
If you are in a Windows environment, you can install Cygwin, and then in the setup, you find gnupg in the tools section. Just select it and install it.
If you are in a Linux environment, then probably you will find GnuPG ready at the command line.

Just type
$ gpg --version

and it will give you information about the version and the available ciphers, like this:

gpg (GnuPG) 1.4.18
Copyright (C) 2014 Free Software Foundation, Inc.
License GPLv3+: GNU GPL version 3 or later
This is free software: you are free to change and redistribute it.
There is NO WARRANTY, to the extent permitted by law.

Home: ~/.gnupg
Supported algorithms:
Pubkey: RSA, RSA-E, RSA-S, ELG-E, DSA
Cipher: IDEA, 3DES, CAST5, BLOWFISH, AES, AES192, AES256, TWOFISH,
        CAMELLIA128, CAMELLIA192, CAMELLIA256
Hash: MD5, SHA1, RIPEMD160, SHA256, SHA384, SHA512, SHA224
Compression: Uncompressed, ZIP, ZLIB, BZIP2

I don't know if we shoudn't use GnuPG version 2, and for what reason. This version (1.4.18) includes ciphers like RSA-2048, and AES256, so what do we need more?
Also SHA256 and SHA512 are available for hashing, so that's all we need.

If you have never used gpg before, then, on running it the first time, it will create the directory .gnupg in your home directory, and in that directory the keys will be stored.
With GnuPG you can encrypt using a Public Key Infrastructure, that's asymmetric encryption, and symmetric encryption as well. In practice, both are being used.

In this post, I will concentrate on PKI-encryption, because that is the starting point for secure communication.

In PKI, every participant generates a couple of keys: a pair that consists of a public key and a private key. If you want to send an encrypted message to a friend, you encrypt the message with his public key, and then he will be the only one that will be able to decrypt the message, using his private key.
One of the most important points in here is, that you need to be sure that the public key you use, is indeed the public key of your friend. There are techniques to verify this, like exchanging the key in person, or exchanging the key fingerprint on a phone call, see the man page for how to make a fingerprint.

Anyway, let's start with generating our keys:

$ gpg --gen-key

This command will prompt you to make some choices and we can use the defaults, that is: RSA-2048 and keys that never expire.
Then type in a name, which should be unique, optionally an email-address, and a description. Name and description can both be used for identification of the key.
Then type a passphrase, in this example I will use "MyPassphrase" and the keys will be generated.
For this example I chose the name "Edward" and comment "Developer".
The keys will be stored in directory .gnupg in your home directory.
You can list the keys anytime with:

$ gpg --list-keys

and that will give us the list of available keys, like this:

/home/edward/.gnupg/pubring.gpg
---------------------------------
pub   2048R/B3CFA5C4 2015-02-01
uid                  Edward (Developer)
sub   2048R/74199587 2015-02-01

If you want to share your key, then you need to export your key, and for that, use the command:

$ gpg --armor --export "Edward (Developer)"

This gives the following output:

-----BEGIN PGP PUBLIC KEY BLOCK-----
Version: GnuPG v1

mQENBFTOph0BCAC4HxY7laoONh6Pcy6PEL89+UVG0SbQHYJ1w2h6jToZvSdC2nF1
wM4LubIe6kDwk7FZaPxwaLVLYyMkgWIC+bV02fAimSt0jIcERL1F0kCSkikXR9OJ
1Im6oOMDd3kqSG/KHkIn4HasDIpG4cizEbWURYUqKCCuZcmu7nfiHI5IfqfrHqKE
gS/mflewA8C2JX+T2HGL4U+vJtL0X1n0b5iN/EVH4C6a0AdWs6+PLeIF9OMLAK1Q
m4pD+8J/UlHhMEs3IMwbLA2kvPKdwM2nDwkMsJDUyNv3m7D/Cq+b6Z9Ukd84DVJY
BD2ma4yxnKmsXWBnwtVFKJ4lrKYSx03eKrVjABEBAAG0EkVkd2FyZCAoRGV2ZWxv
cGVyKYkBOAQTAQIAIgUCVM6mHQIbAwYLCQgHAwIGFQgCCQoLBBYCAwECHgECF4AA
CgkQl+yj1bPPpcQSXgf/Y6JP6abLqBselP5p9Xnn2cc2nTK8o/1YYWGQlodGCDG4
cgCJtDZLQoH2PHEhFNpJ1ZDPE7ndKB3zx5ndoR66rnWZZ7TwJHKh32kuHux9VTQQ
0tngKIX+izfKSlcTHGXXl+sKqaXxvGeNOPr81cl+3ZYEkWrlgBraWJGr/SpZzaK7
csROzg90D6s6NRCyAAS0DyKfAPhVccuFC6wArlEuG5IAmEwjOfOC8EHgbcWKDv9m
KGpczSWpx92/9UEjrl62pgk+hJVDWCkZPN7w+/kQWAaMOaJJuOwMksjnoeKGKaKm
dd46rkGFeZO4QnM+M9oS/IMeCJpfKaWcxjeeEyOZPbkBDQRUzqYdAQgAu47ZfZ8t
/VzTnZ0Ok4Jjc1jwXTjQThVfSif5MRW7SZnYkxv+Pxvl7s8prBWn0U3oD45mbfwg
8PV9gOja3VnbJOXQ8VYSfUXra2+5E2NvGJhO8/gdI62M9te31pJtcuHmocyYsHUI
GpJrrHoD8CCut6DymyF/ibIN7q6vwtWLTBr+UmDj/4KwaOj/s5mE37U56Rzcfy8/
+kOleivAiHdRVLFA6GncH50gS1iCVME76p+mHInwwjN6+Nx4hvJunko0+9RAJ4M6
OSEHRvIKV4M1VWcmvNuVfS8lyCc1lEctBv/PJly8XoVBHkXHW2j5u1eYNluBG907
icErystem1ZtdQARAQABiQEfBBgBAgAJBQJUzqYdAhsMAAoJEJfso9Wzz6XEc1QH
/1uhJ2esonovm4W2sDTZOKVQeSEpPtpmnn5igx5Mky/Ulu2T+h9ecFU9E8c+Z9Jc
k67OKKniGEHXY81Hjm/d0hkE8zGv+uBVgqwjK97R0rbLB58B7hYxFSIoQ97DiWfs
F9sXIEDIxQNhEeAT5wjuoVBcR/qey+seGuwdtz5rHE9VEr6Ca7AaQegjcd0iYC4I
rzTZ/ZiAyzIc+XQLNzmcG39qDTXihEq/5qxZHO+/wtYJKX5lbgSSA44EX9AYLJ2x
T4NfLfqQPU/XWxRkmjrFc7CVtDGcE+W4HB0VVDbk5YK2isBaHAKlVaj00GEZTty1
zLR423RBMYpMMEydQv5+Muc=
=mxbq
-----END PGP PUBLIC KEY BLOCK-----

When you leave out the option --armor, then the key will be exported in binary format, and when you leave out the name, then every public key in your file will be exported.

So now we are ready to encrypt some file. Let's make a file, named text_to_encrypt.txt with contents:

This text is going to be encrypted.

With the following command:

$ gpg --encrypt text_to_encrypt.txt

after choosing a user ID, which can be "Edward (Developer)", we will produce the (binary) file

text_to_encrypt.txt.gpg

If you prefer to get an ASCII file, include the option --armor, so type:

$ gpg --encrypt --armor text_to_encrypt.txt

and this will produce the file:

text_to_encrypt.txt.asc

Since it is an ASCII file, we can read the output, and it will be:

$ cat text_to_encrypt.txt.asc
-----BEGIN PGP MESSAGE-----
Version: GnuPG v1

hQEMA7U9b+J0GZWHAQf/XJAt74zj2f1TVjhGGG+dI5OYSopRX6Uou2H0nq+ZeOuv
S1PFIobJqjpPv7tAxT3I4DIexZe6ym3ae3sV1gW1zQ+FXHqKnSMOGLGZ1L8t0qZ5
5avfpaWvzCySKxf65RLsDS6OTAmUq9r/IawXJUKGidyUaBOoLwSGROsZ8bxuT5Ka
yI62F5v3PMBbqr++dh8rRxMst0mT//AkV/44k4wqgZG/WWPwUo1trmYconQq6wuP
rN7LNtTJwzbftlvKa/d4XXzVA+8kS4EFIELVL5TxqRxUW3rfbnfbYbjH++RwKQy/
HEY2cspQdct+BgO4oszoqCMAhuIEyiLf6vSW9F/nbdJqAaqom3XCT/BkWhHYa7B0
1pASEMtkpJJdflTKALHGw84Q7lkzD8FNDSAExmYCYbHFbePEvTqouApQhUhvGl70
7N3Jb8TvgwH//CjkMJMOIiVl4bbe5ncsx1FHP1bhHJXUhijYWh+KRXGJZg==
=YpjA
-----END PGP MESSAGE-----

Now, to decrypt, we can use the command:

$ gpg --decrypt

Which will output the decrypted context to standard output, and we can redirect it to a file like:

$ gpg --decrypt text_to_encrypt.txt.asc > decrypted_text.txt

As input-file we can use either the binary, or the ASCII file, and the result of this command will be the followig:

You need a passphrase to unlock the secret key for
user: "Edward (Developer)"
2048-bit RSA key, ID 74199587, created 2015-02-01 (main key ID B3CFA5C4)

Enter passphrase:

And after entering our passphrase, the file decrypted_text.txt will be created and its contents will be:

$ cat decrypted_text.txt
This text is going to be encrypted.

That's about it for this post.
I just want to say this. The method of encryption used, RSA, is not suitable for encrypting large files. There is a limit to the maximum file size that can be encrypted and it is about 245 bytes. Also RSA encryption seems to be rather slow.
For encrypting large files, usually a symmetric cipher is used, like AES-Rijndael.

With GnuPG we just need to add the option --symmetric to the encrypt command, and it will first ask us for a passphrase with confirmation, and then for the user id.

$ gpg --encrypt --symmetric --armor text_to_encrypt.txt
You did not specify a user ID. (you may use "-r")

Current recipients:

Enter the user ID.  End with an empty line: Edward (Developer)

Current recipients:
2048R/74199587 2015-02-01 "Edward (Developer)"

and the result will be the following:

$ cat text_to_encrypt.txt.asc
-----BEGIN PGP MESSAGE-----
Version: GnuPG v1

hQEMA7U9b+J0GZWHAQgAjF4/vOl+ZHI1NN94wN/8kezQKj7cQ4QnVvZERBPCnBI2
pZSCAUUPPiDIDpeBSFpplcM50EohlORP0k/CbtcqzSNm47u10f60mT913wO9HSxS
G+aMlrR5jyW3HYPTmjLSUW0wSTTC+oMVhGaxoOGRiHnDDZ+loGvRNCfwtXyaB1Jv
RRFwHIEOTfkBPHv4JtQ1S56PSorncnpeeEWhkonsLl+d2/F3ONLwON8Nk+9bUSlL
GI/XsF6FEBpYZw5Z/vif4m1V/zfBJigxH++iSG7SoJpUSTYWuTIgZCM3ZS0moFAP
KG6zYcqUHs7dbysHcZe2REkeRrXaTBdWPTeXARjskYwuBAMDAsdcbIpkoSC7YOCT
tfP+2wcCchRck/Z4yjhx4sopi3FHJexNBiNHjd8GqtJqAf/cKju6HHujlXCP7RrR
G5F0LGEio6UfyiNcjLEV1dao6m3dovtiSNPTOypEfIoIXN6yP9SQdankJPx4HSHt
eojxbi9D4iHSOtPPxJ4+X2hc4a/RMFTGvPZTENsJ/Yt68z8MzrKDCUOxpg==
=QuxQ
-----END PGP MESSAGE-----

Decryption goes with the same command as before:

$ gpg --decrypt text_to_encrypt.txt.asc

and it will result in

You need a passphrase to unlock the secret key for
user: "Edward (Developer)"
2048-bit RSA key, ID 74199587, created 2015-02-01 (main key ID B3CFA5C4)

gpg: encrypted with 1 passphrase
gpg: encrypted with 2048-bit RSA key, ID 74199587, created 2015-02-01
      "Edward (Developer)"
This text is going to be encrypted.


woensdag 6 juni 2012

Blog verrijkt met twitter widget

Op een moderne website mag het twitter widget niet ontbreken, maar hoe doe je dat?
Het is verrassend simpel: via de link 'Resources' links onder in je Twitter pagina


ga je naar 'Widgets'


en daarna voor 'Widgets for my Website' (Facebook blijkt ook te kunnen)


en daar kies je de 'Search widget' (of een andere). Ik heb gekozen voor de volgende instellingen


Je kunt het testen met de knop 'Test settings' en als je tevreden bent druk je op de knop 'Finish & Grab Code' die je de keuze geeft HTML te knippen en te plakken óf direct aan blogger toe te voegen met de roodomlijnde knop.


Daarna heb ik de layout in blogger wat moeten aanpassen en dat heeft tot dit resultaat geleid.

Succes als je het zelf gaat proberen!

donderdag 10 mei 2012

My first video about creating Oracle ADF applications is online

After having seen a quite a few instructional videos about Oracle ADF, which have been very helpful to me in learning the tricks, I decided to add some myself.
In this first video I make the most simple ADF application that I can think of: it is based on one database table and allows browsing through the data.


vrijdag 6 april 2012

Oracle ADF: tweaking layout with custom skin

One thing that puzzled me in Oracle ADF applications is whether it's possible to change the form layout and how this can be done.
I noticed that most of the sample form applications have their field labels aligned right, as you can see in the example from my last post


while I know from experience that most users prefer the labels to be aligned left.
Is it possible? Yes, it is, and here is how.

First of all, let me tell you that I was disappointed to find out that there is no property at the form layout that can be changed to do the trick. The property 'LabelAlignment' does not do it.
The solution seems to be: create a custom skin!
This is not easy at all. There are several instructions available that don't tell the whole truth, because they lack some crucial information.
In this post I will try to give an example which will be useful, but I realize that in the next version of JDeveloper things may be different. Here I use 11.1.1.5.0.

Creating a custom skin means that we will make a new CSS file and so it will be useful to use the ADF extensions to the CSS editor, which are not enabled by default, so in Tools -> Preferences -> CSS Editor check the option 'ADF Faces Extension'.

Next thing we'll do is register the schema definition trinidad-skins.xsd for our file trinidad-skins.xml. In Tools -> Preferences -> XML schemas and click the button 'Add' and browse to '<JDeveloper_Home>/Oracle/Middleware/oracle_common/modules/oracle.adf.view_11.1.1/trinidad-impl.jar!/org/apache/myfaces/trinidadinternal/ui/laf/xml/schemas/skin/trinidad-skins.xsd'. Fill in extension '.xml'. This seems to be an essential step.
These actions are explained well in Oracle's Documentation, if it's still there.

Next thing we'll need to do is to create a file named 'trinidad-skins.xml' and the point is that it needs to be created in the right location, so right click on ViewController in your project (I use the project made in my last post), and choose "New..."


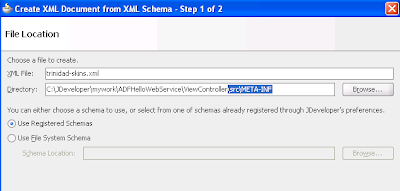
then choose General -> XML -> "XML Document from Schema", which will popup up a dialog. In this dialog we type in the name of the file "trinidad-skins.xml", we add "\src\META-INF" to the directory and we check the "Use Registered schemas" option:


and then click "next". On the next screen accept the default namespace "http://myfaces.apache.org/trinidad/skin", but change the root element to "skins" and click "finish". This will create a XML file based on the chosen schema definition.
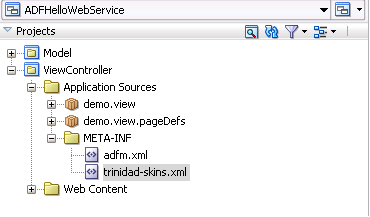
Note that the file has been added to our 'ViewController' -> 'Application Sources' -> META-INF 'folder'.


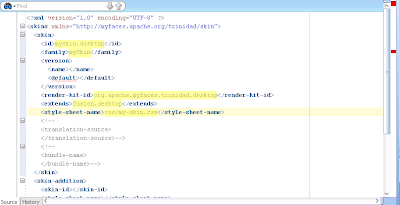
Now we will enter some essential data (click on the image to enlarge):


first of all, the id of our skin:
<id>myskin.desktop</id>, then the skin family, that will be the identifier to be used by our application (file trinidad-config.xml): <family>mySkin</family>, then <render-kit-id>org.apache.myfaces.trinidad.desktop</render-kit-id>, which is default, the extend-tag indicates that we will extend the fusion skin <extends>fusion.desktop</extends>, and very important the location of our skin: <style-sheet-name>css/my-skin.css</style-sheet-name>. We will have to create that one now. Note the location "css/...". It is very important to get this location right, since otherwise the application won't find it.

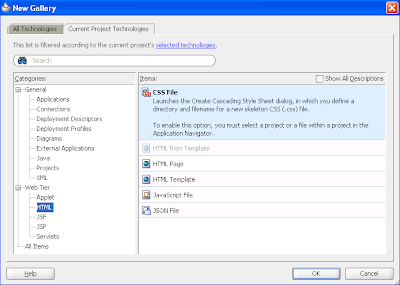
So we will create our css-file now. Right click "ViewController", choose "New..." and choose 'CSS file' from the 'Web Tier' -> 'HTML' section.


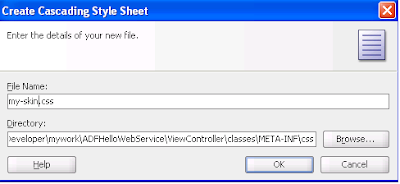
Change the file name to "my-skin.css" and change the default location to "...\ViewController\classes\META-INF\css". (Note that the default location is ..."ViewController\public_html\css", which will not work).


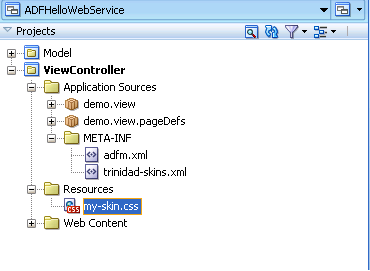
After clicking OK, we will see the file appear in our project under "Resources" , which should be fine.


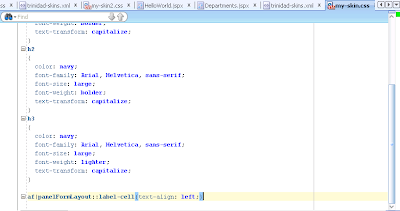
and we add at the end of this file the magic words:


af|panelFormLayout::label-cell{text-align: left;}


Save the file.

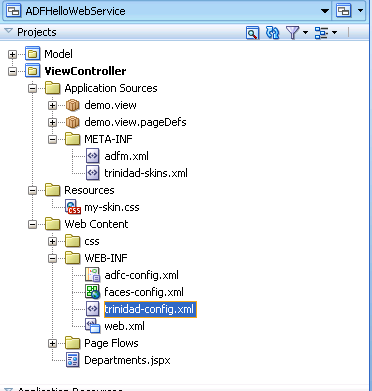
Now we have to tell our application to use this new skin, so we have to find the file 'trinidad-config.xml'. It is in the folder 'Web Content\WEB-INF', as shown here:


In this file we change the skin-family to 'mySkin' and we empty the skin-version.


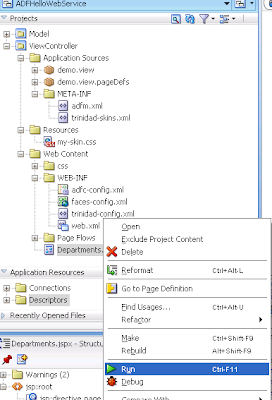
And, after saving the file, we right-click 'Departments.jspx' and choose 'Run'.


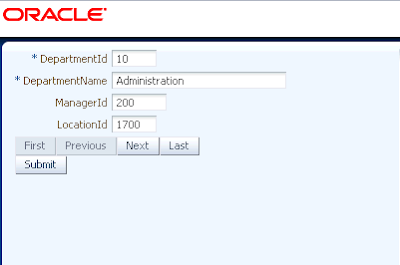
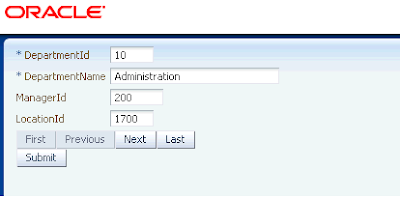
and we see our screen with labels aligned left:

vrijdag 30 maart 2012

Oracle ADF: integration with web services

It is amazing how easy it is to integrate your Oracle ADF application with web services. However, this is not known to everyone.
So here is a simple instruction about how to implement a web service from PL/SQL, expose this web service as a data control in your ADF application and call it from a screen. We will implement a simple web service which will take as input a name, and will return "Hello, <name>!".
To achieve this the article is split into four parts:
1. build simple ADF application
2. implement web service from PL/SQL
3. expose web service as data control
4. build web service call from screen

1. Build simple ADF application
We build a simple ADF application with JDeveloper 11g release 1 (11.1.1.5.0).
Choose "New Application..." and fill in the name "ADFHelloWebService" as on the next image:


Click next a few times and accept all defaults. This results in a simple ADF application. We will set up a database connection (step 2. in the checklist) to the sample HR-schema and make a simple screen on the departments table.


When this has been done, we go to step 3. of the checklist "Build business services" and then "go to substeps". First we create an Entity Object on the departments table in the HR schema, make an updatable view too, and we will accept the default names "Departments" for the entity object, and "DepartmentsView" for the view object. This will result in a data control which we can see after refreshing the data controls part of JDeveloper:


Now click on the "web content" node in the ViewController tree, and choose "New..." and then "JSF Page" from the Web Tier section. Choose the name Departments.jspx and accept the defaults "create as XML Document", page template "Oracle three column layout", and "don't automatically expose UI components in a Managed Bean". After accepting the dialog, we get our page in our Web Content folder and we enter design mode for this page. In this screen, we delete the "end" section, so we keep only two columns. Then we drag, from the data controls section, the "DepartmentsView1" onto the "start" column, and we choose "ADF Form" from the popup menu, that appears. Check "Include navigation controls", and "Include submit button" for completeness and click OK.
Then we right-click on the page "Departments.jspx" in the ViewController-section, and choose "Run".


After waiting for a while the page will appear in our default browser.


So that brings us to point 2. implement a PL/SQL procedure as a web service. We will use a simple function, named "hello" in a package "hr_pck". The source code for the specification is:
create or replace
package hr_pck as
  function hello (p_name in varchar2) return varchar2;
end hr_pck;


and the package body:
create or replace
package body hr_pck as
  function hello (p_name in varchar2)
  return varchar2
  is
  begin
    return 'Hello, '|| p_name;
  end hello;
end hr_pck;


Now, we will add a web service, based on this PL/SQL function, to our "Model". So we right-click on "Model" and choose "New... . Then we choose "Web services" under the "Business Tier" node and we choose "PL/SQL Web Service".


Note: this will not work with all databases. Some XE (Express edition) databases don't support this, here we use Enterprise Edition 11.2.0.1.0.

In step 3 we choose database, package, and enter the web service name "HelloWebService".


and in step 5 we check the function we want to use for our web service.


then click next until and accept all default until the wizard is finished. This will create a bunch of files and will open up the visual view for the WSDL:


We have come to step 3. of our plan: create a data control for our web service. Look up the WSDL-node in the "Model" section, "Web Content", "WEB-INF", "wsdl".


Right-click on the WSDL-file and choose "Create data control". After some magic the data control will appear in the "data controls" section.


It is now ready to be included in our web page, which we created earlier.
So we have come to step 4. Call our web service from our screen.

Select the hello 'method' from the "Data controls" section and drag it onto the visual view of our page "Departments.jspx".


choose "create ADF parameter form" from the popup:


Now the parameter form dialog will pop up and we change the label to 'Enter name', and we add a field with the green plus. The added field will be an "ADF output text" component. Note that at this point we cannot bind the new field to the web service output. We will do this in the next step.


so we click "OK" and we rebind the second field to "another ADF control".


and in the dialog that pops up, we choose the web service output.


click OK and see how the page design changed


Now run the page again, by right clicking Departments.jspx and choosing "Run", and see the screen appear:


Here we type some name as input


and after clicking the "hello" button, the result will appear:


so we see the ouput from the web service "Hello, Daisy" appear underneath.

Conclusion is that it is very easy to create web services, call them and receive output from them in an ADF application, using JDeveloper.

woensdag 14 december 2011

Higgs-boson at 126 GeV

I wish I could understand this comment on Slashdot

"
If you assume no Higgs then you end up with a Lagrangian without any mass terms (because if you put those in you break the local gauge symmetries). However when you do the calculation of e.g. e+e- --> W+W- you have to use the fact that the electron has a mass in the Feynman calculation. This non-zero mass causes you you have a "left over" term which does not cancel in the high energy limit and causes you to break unitarity.

The Higgs mechanism gets around this by adding a new diagram e+e- --> H --> W+W- which precisely cancels the electron mass term. The reason the cancellation is perfect is because the electron gets its mass from coupling to the non-zero Higgs vacuum expectation value.

So effectively you are correct in that the reason the model fails at high energy is because you use the electron mass in the cross-section calculation but have no electron mass term in the Lagrangian so you are not being consistent....but you cannot simply stick a mass term in there without adding symmetry breaking interactions which are not observed in nature. Hence you have to add a Higgs field with a non-zero vacuum expectation value which in turn adds more than just the effective mass terms.

Hope that is comprehensible - it is hard to explain in just typed text!
"
by Roger W Moore

I think I need to recap some of my physics learnings books for that.....

woensdag 18 mei 2011

Oracle SOA Suite Demo

Om het niet te vergeten, dit is de map waarin de weblogic opstart-bestanden staan:
C:\Middleware\SOASuite11g\user_projects\domains\SOASuiteDevDomain\bin

Hierbij is "SOASuiteDevDomain" de naam van het weblogic-domain.

Met het commando startWebLogic.cmd starten we de weblogic-server.
En met het commando startManagedWebLogic.cmd bam_server1 starten we de BAM-server. (user weblogic, password welcome1)
Nog even resumeren: de administration console vind je op URL http://localhost:7001/console/ (weblogic/welcome1), en de BAM server op http://localhost:9001/OracleBAM.

Het starten van de ADF demo (Fusion Order Demo) doen we voorlopig vanuit JDeveloper door vanuit de applicatie StoreFrontModule op het onderdeel StoreFrontUI rechts te klikken en "Run" te kiezen. De applicatie wordt dan op de geïntegreerde weblogic 'gedeployed'. De URL verschijnt dan in de log na het starten: http://127.0.0.1:7101/StoreFrontModule/faces/home .