woensdag 6 juni 2012

Blog verrijkt met twitter widget

Op een moderne website mag het twitter widget niet ontbreken, maar hoe doe je dat?
Het is verrassend simpel: via de link 'Resources' links onder in je Twitter pagina


ga je naar 'Widgets'


en daarna voor 'Widgets for my Website' (Facebook blijkt ook te kunnen)


en daar kies je de 'Search widget' (of een andere). Ik heb gekozen voor de volgende instellingen


Je kunt het testen met de knop 'Test settings' en als je tevreden bent druk je op de knop 'Finish & Grab Code' die je de keuze geeft HTML te knippen en te plakken óf direct aan blogger toe te voegen met de roodomlijnde knop.


Daarna heb ik de layout in blogger wat moeten aanpassen en dat heeft tot dit resultaat geleid.

Succes als je het zelf gaat proberen!

donderdag 10 mei 2012

My first video about creating Oracle ADF applications is online

After having seen a quite a few instructional videos about Oracle ADF, which have been very helpful to me in learning the tricks, I decided to add some myself.
In this first video I make the most simple ADF application that I can think of: it is based on one database table and allows browsing through the data.


vrijdag 6 april 2012

Oracle ADF: tweaking layout with custom skin

One thing that puzzled me in Oracle ADF applications is whether it's possible to change the form layout and how this can be done.
I noticed that most of the sample form applications have their field labels aligned right, as you can see in the example from my last post


while I know from experience that most users prefer the labels to be aligned left.
Is it possible? Yes, it is, and here is how.

First of all, let me tell you that I was disappointed to find out that there is no property at the form layout that can be changed to do the trick. The property 'LabelAlignment' does not do it.
The solution seems to be: create a custom skin!
This is not easy at all. There are several instructions available that don't tell the whole truth, because they lack some crucial information.
In this post I will try to give an example which will be useful, but I realize that in the next version of JDeveloper things may be different. Here I use 11.1.1.5.0.

Creating a custom skin means that we will make a new CSS file and so it will be useful to use the ADF extensions to the CSS editor, which are not enabled by default, so in Tools -> Preferences -> CSS Editor check the option 'ADF Faces Extension'.

Next thing we'll do is register the schema definition trinidad-skins.xsd for our file trinidad-skins.xml. In Tools -> Preferences -> XML schemas and click the button 'Add' and browse to '<JDeveloper_Home>/Oracle/Middleware/oracle_common/modules/oracle.adf.view_11.1.1/trinidad-impl.jar!/org/apache/myfaces/trinidadinternal/ui/laf/xml/schemas/skin/trinidad-skins.xsd'. Fill in extension '.xml'. This seems to be an essential step.
These actions are explained well in Oracle's Documentation, if it's still there.

Next thing we'll need to do is to create a file named 'trinidad-skins.xml' and the point is that it needs to be created in the right location, so right click on ViewController in your project (I use the project made in my last post), and choose "New..."


then choose General -> XML -> "XML Document from Schema", which will popup up a dialog. In this dialog we type in the name of the file "trinidad-skins.xml", we add "\src\META-INF" to the directory and we check the "Use Registered schemas" option:


and then click "next". On the next screen accept the default namespace "http://myfaces.apache.org/trinidad/skin", but change the root element to "skins" and click "finish". This will create a XML file based on the chosen schema definition.
Note that the file has been added to our 'ViewController' -> 'Application Sources' -> META-INF 'folder'.


Now we will enter some essential data (click on the image to enlarge):


first of all, the id of our skin:
<id>myskin.desktop</id>, then the skin family, that will be the identifier to be used by our application (file trinidad-config.xml): <family>mySkin</family>, then <render-kit-id>org.apache.myfaces.trinidad.desktop</render-kit-id>, which is default, the extend-tag indicates that we will extend the fusion skin <extends>fusion.desktop</extends>, and very important the location of our skin: <style-sheet-name>css/my-skin.css</style-sheet-name>. We will have to create that one now. Note the location "css/...". It is very important to get this location right, since otherwise the application won't find it.

So we will create our css-file now. Right click "ViewController", choose "New..." and choose 'CSS file' from the 'Web Tier' -> 'HTML' section.


Change the file name to "my-skin.css" and change the default location to "...\ViewController\classes\META-INF\css". (Note that the default location is ..."ViewController\public_html\css", which will not work).


After clicking OK, we will see the file appear in our project under "Resources" , which should be fine.


and we add at the end of this file the magic words:


af|panelFormLayout::label-cell{text-align: left;}


Save the file.

Now we have to tell our application to use this new skin, so we have to find the file 'trinidad-config.xml'. It is in the folder 'Web Content\WEB-INF', as shown here:


In this file we change the skin-family to 'mySkin' and we empty the skin-version.


And, after saving the file, we right-click 'Departments.jspx' and choose 'Run'.


and we see our screen with labels aligned left:

vrijdag 30 maart 2012

Oracle ADF: integration with web services

It is amazing how easy it is to integrate your Oracle ADF application with web services. However, this is not known to everyone.
So here is a simple instruction about how to implement a web service from PL/SQL, expose this web service as a data control in your ADF application and call it from a screen. We will implement a simple web service which will take as input a name, and will return "Hello, <name>!".
To achieve this the article is split into four parts:
1. build simple ADF application
2. implement web service from PL/SQL
3. expose web service as data control
4. build web service call from screen

1. Build simple ADF application
We build a simple ADF application with JDeveloper 11g release 1 (11.1.1.5.0).
Choose "New Application..." and fill in the name "ADFHelloWebService" as on the next image:


Click next a few times and accept all defaults. This results in a simple ADF application. We will set up a database connection (step 2. in the checklist) to the sample HR-schema and make a simple screen on the departments table.


When this has been done, we go to step 3. of the checklist "Build business services" and then "go to substeps". First we create an Entity Object on the departments table in the HR schema, make an updatable view too, and we will accept the default names "Departments" for the entity object, and "DepartmentsView" for the view object. This will result in a data control which we can see after refreshing the data controls part of JDeveloper:


Now click on the "web content" node in the ViewController tree, and choose "New..." and then "JSF Page" from the Web Tier section. Choose the name Departments.jspx and accept the defaults "create as XML Document", page template "Oracle three column layout", and "don't automatically expose UI components in a Managed Bean". After accepting the dialog, we get our page in our Web Content folder and we enter design mode for this page. In this screen, we delete the "end" section, so we keep only two columns. Then we drag, from the data controls section, the "DepartmentsView1" onto the "start" column, and we choose "ADF Form" from the popup menu, that appears. Check "Include navigation controls", and "Include submit button" for completeness and click OK.
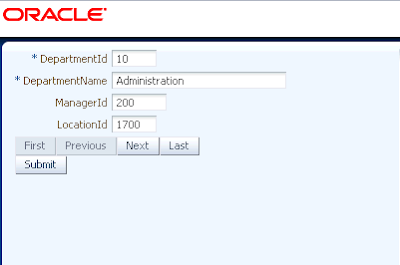
Then we right-click on the page "Departments.jspx" in the ViewController-section, and choose "Run".


After waiting for a while the page will appear in our default browser.


So that brings us to point 2. implement a PL/SQL procedure as a web service. We will use a simple function, named "hello" in a package "hr_pck". The source code for the specification is:
create or replace
package hr_pck as
  function hello (p_name in varchar2) return varchar2;
end hr_pck;


and the package body:
create or replace
package body hr_pck as
  function hello (p_name in varchar2)
  return varchar2
  is
  begin
    return 'Hello, '|| p_name;
  end hello;
end hr_pck;


Now, we will add a web service, based on this PL/SQL function, to our "Model". So we right-click on "Model" and choose "New... . Then we choose "Web services" under the "Business Tier" node and we choose "PL/SQL Web Service".


Note: this will not work with all databases. Some XE (Express edition) databases don't support this, here we use Enterprise Edition 11.2.0.1.0.

In step 3 we choose database, package, and enter the web service name "HelloWebService".


and in step 5 we check the function we want to use for our web service.


then click next until and accept all default until the wizard is finished. This will create a bunch of files and will open up the visual view for the WSDL:


We have come to step 3. of our plan: create a data control for our web service. Look up the WSDL-node in the "Model" section, "Web Content", "WEB-INF", "wsdl".


Right-click on the WSDL-file and choose "Create data control". After some magic the data control will appear in the "data controls" section.


It is now ready to be included in our web page, which we created earlier.
So we have come to step 4. Call our web service from our screen.

Select the hello 'method' from the "Data controls" section and drag it onto the visual view of our page "Departments.jspx".


choose "create ADF parameter form" from the popup:


Now the parameter form dialog will pop up and we change the label to 'Enter name', and we add a field with the green plus. The added field will be an "ADF output text" component. Note that at this point we cannot bind the new field to the web service output. We will do this in the next step.


so we click "OK" and we rebind the second field to "another ADF control".


and in the dialog that pops up, we choose the web service output.


click OK and see how the page design changed


Now run the page again, by right clicking Departments.jspx and choosing "Run", and see the screen appear:


Here we type some name as input


and after clicking the "hello" button, the result will appear:


so we see the ouput from the web service "Hello, Daisy" appear underneath.

Conclusion is that it is very easy to create web services, call them and receive output from them in an ADF application, using JDeveloper.